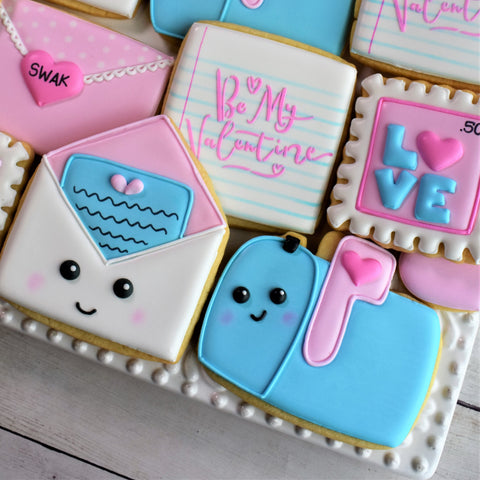
So let's kick off 2019 with a super adorable Happy Love Note (#happylovenote) Cookie Set. Last week, Topher and I were cleaning out our storage room and we came across a box labeled 'Love Notes from Anne'. So many sweet thoughts from when we were dating and early in our marriage. I don't draft as many notes these days, but maybe I should. For now, at least, I'm drafting them in cookies!
Check out the in-depth YouTube video tutorial and then see below for hints and tips to recreate this cookie set.
This video mainly focuses on these three cookies, the Happy Envelope, the Mailbox, and the Be My Valentine cookie. I provide templates for them below, and include two bonus templates for the LOVE Stamp Cookie and the SWAK Envelope Cookie. These are helpful in recreating these cookies!
PREPPING THE COOKIES:
COOKIE YIELD: For a single batch of dough I made 17 regular sized cookies (4 mailboxes, 4 Love Stamps, 3 Happy Envelopes, 3 Be My Valentine Notes, and 3 SWAK Envelopes) and 8 mini heart cookies. I should note that I roll my cookies to 1/4" thick using the Dough EZ Rolling Mat System. The thickness of your cookies will impact your yield.
COOKIE RECIPE: For a cookie recipe and rolling and baking video CLICK HERE - this recipe can be doubled in a KitchenAid Mixer.
**one baking note on this project. I used the Camera Cookie Cutter to make the cute mailbox and trimmed a small section...check it out...
DECORATING TIPS:
TEMPLATES: In the video you might have noticed that the envelope and mailbox had traced yellow guidelines on it. You can trace guides or even use a projector. Download the zip file for all four of the FREE templates for these cookies - CLICK HERE
CUTTERS (click on the cutter title to view in shop): This set features the Rectangle Cutter (SWAK envelope), the Fluted Square Cutter (stamp), The 3.5" Square Cutter (Be My Valentine), The Camera Cutter (mailbox), and the house from the 2pc Gingerbread House Cutter Set (Happy Valentine Envelope). They are also available as a set with the stencils in the 'Happy Love Note Decorating Bundle'.
STENCILS and AIRBRUSH: This set features the Pinstripes Stencil and Be My Valentine Stencil. They are also available as a set with the cutters in the 'Happy Love Note Decorating Bundle'. I used a scraper tool to stencil the Be My Valentine. I used the Cookie Countess Airbrush System to create the Be My Valentine Note. I mixed White airbrush color with Hawaiian Blue to get the pastel blue. I also used a stencil blocker from the 6pc Banner Masks set. You can use one of these masks, or even just cut a piece of paper to block the color at the top of the note.
SPECIAL TOOLS: In this set I use the Carnation Pink Crystal Color and a round food safe brush from the 5pc Wilton Set to blush the cheeks on the mailbox and the Happy Valentine Envelope.
PREPPING THE ROYAL ICING:
ICING PREP: For a single batch of dough, I typically use a single batch of icing. Since I'm using a KitchenAid mixer, I made a double batch of icing and split it in half (reserving half for another project). I use approximately 5 oz of white icing, 5 oz of sky blue icing, 5 oz of light pink icing, 2 oz of dark pink icing, and 2 oz of black icing. A total of 19 oz of icing. I don't measure exactly...I estimate. For a more detailed look at icing planning, CLICK HERE to read this helpful blog post.
ROYAL ICING RECIPE: For a royal icing recipe and video CLICK HERE - this recipe can be doubled in a KitchenAid Mixer.
ICING COLORS: On this project I used ChefMaster food gels: Bright White, Super Black, Deep Pink for both the light and dark pinks (a very small dot for the light pink and a larger dot for the darker pink), and Sky Blue. CLICK HERE to check out all the food gel options in our shop.
PLANNING YOUR PROJECT TIMELINE:
(I like to break up the decorating process as follows. It fits better in my life than tackling everything in one day. Times based on a single batch of cookies, increase as needed):
Day 1 PREP COOKIES AND ICING: Mix Dough (30 mins), Chill Dough (2 hours inactive time), Roll and Bake (1 hour), Mix Royal Icing and Prep Icing Colors (1 hour)
Day 2 DECORATE: Outline and Flood Cookies (1-2 hours), Allow to dry in front of fan before adding details (1 hour for standard cookies, but allow 6 hours of dry time on the cookie stenciled with royal icing), Piping details and stenciling (1-2 hours)
**ALLOW COOKIES TO FULLY DRY 18-24 BEFORE PACKING. STORE IN A COOL OVEN OVER NIGHT.**
Day 3 PACKING COOKIES: For tips on packing cookies, CLICK HERE to check out this helpful blog post with links to my favorite packing and shipping materials.
PACKAGING AND BOXING YOUR COOKIES:
A set of 3 cookies fits really well in the www.brpboxshop.com 9" white window box.
If you're looking to pack a dozen, try the 14" white window box!
MATERIALS LIST:
Happy Love Note Decorating Bundle: Pick up the stencils and cutters as one kit. Regularly $24.95, but save 10% when purchased as a bundle for $22.45. CLICK HERE to view in shop.
DECORATING TOOLS:
- Cuttes (see above)
- Stencils (see above)
- Airbrush Colors (white and Hawaiian blue)
- Food Gel Colors (white, black, deep pink, and sky blue)
- PME Scribe
- Tipless Decorating Bags
- #2 Tip (5)
- #44 Tip (1)
- #1.5 Tip (1)
- Cookie Countess Airbrush System
- Stencil Genie
- Food Markers (used yellow, pink and black)
- Wilton Round Food Safe Brush (for blushing cheeks)
- Carnation Pink Crystal Color (for cheeks)
- Icing Scraper
I want to see what you make! So be sure to tag @Flourboxbakery on Instagram and Facebook and use #happylovenote so I can see what you create!
Happy Decorating!
Anne
- #happylovenote,
- Be My valentine cookies,
- Be My Valentine Stencil,
- cookie tutorial,
- cute envelope,
- Cute mailbox,
- cute mailbox cookie,
- Happy Love Note,
- Happy Love Note cookie set,
- Kawaii Envelope,
- Kawaii Love Note,
- Kawaii stamp,
- Kawaii Valentine's Day Cookies,
- Love Stamp cookie,
- Valentine's Day Cookies,
- Valentine's Day Love Letter


