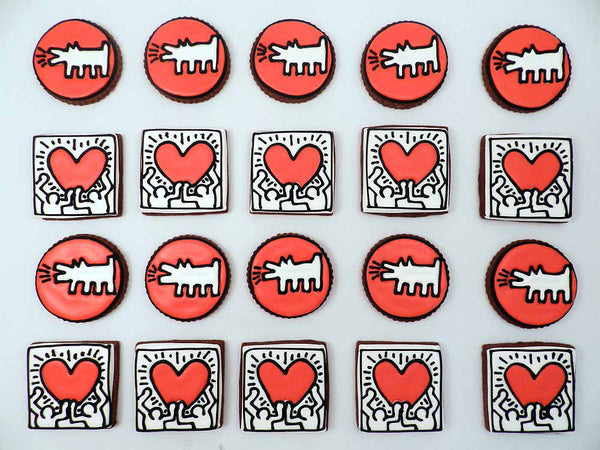
Recently, I was asked to make a special cookie donation to a local charitable event called "For the Love of Art and Chocolate" for Clearwater Conservancy. With this project I attempted to fuse art, chocolate and cookies. I enjoyed myself so much while make these cookies. Take a look-see.

With a little help from my cookie friends Hillary of The Cookie Countess and Georganne of LilaLoa and a whole lot of inspiration from one of my favorite artists, Keith Haring, I made a special set of chocolate art cookies. Yes, you read that right. I made chocolate cut-out cookies.
Georganne is an amazingly talented cookie girl and she is generous with lots of tips and great recipes. I am so glad she shared this (click here) chocolate cut-out cookie recipe because it is really the best ever (and being a Pennsylvania girl, I of course used Hershey's cocoa in the recipe).

I don't want to assume that everyone has heard of Keith Haring, but his graffiti art is very popular and can be found everywhere, all over the world actually! He is familiar to me because he is actually from my hometown of Kutztown, PA. I never met Keith, but I did have the pleasure of working with his dad at a local art exhibition at our town fair.
As a big fan, I wanted to attempt to recreate his art in edible form to pay tribute to him. These images might look familiar, but if you're intersted in learning more about Keith, please visit his site at www.haring.com (caution...there are some explicit images) or if you're online with kids, it would be better to check out www.haringkids.com.
Since this project was for an art event, I thought it would be fun to create a larger cake-sized cookie project. Thankfully, my friend Hillary has already done this several times (create a cookie mosaic). Check out her Fenway Park or her Cinderella Carriage. I have done cookies the size of cakes, but this was the first time I did it as several cookies making up one project. The large cookie cakes are nice, but how do you eat them at a party of event? They are awkward to cut or break apart. Hillary's solution is fantastic, but she made it look easy. It ended up being a little trickier than I anticipated. And, if I'm being truly honest, I actually should tell you I had to bake this twice...the first time I made things way too complicated and messed up the cookies. That's ok...my kitchen smelled doubly chocolately that day.


I took my time setting up the cookies for the picture in the photo tent...I didn't have any extras and so I wanted to get everything placed just so.

Here I am pretending to finish the cookie. But, this is a great close-up view of how the cookies had to be iced. It wasn't just enough to outline the images. I also had to account for the seams between the cookies; and, therefore had to do extra outlining and planning to make sure the final product would have the appearance of a single image.

These colorful dancing figures are so super cool. I see joy and unity. I love how each figure is united and forms that pentagon in the middle. I was worried my cookie version would lose that look and I was thrilled that it came out just right.

I found the easels at Wal-mart (of all places). I checked all over and couldn't find any simple wooden easels. These were exactly what I needed.

I had the cookies displayed on the easels and also had a platter full of cookies for the event. I was told that at first no one wanted to eat the cookies and disrupt my set-up. But then once someone took the first one, they were gone in a flash. How cool. Cookies are made to be eaten, even pretty ones.
I hope you enjoyed this post. It's probably my last until my Valentine's orders are baked, decorated and shipped. It's going to be a busy, busy week!! It's good to be back to baking, though. My heart is happy in my kitchen.
Have a wonderful week,
Anne

