Cookie Decorating 101: The Basics of Making Dough and Icing
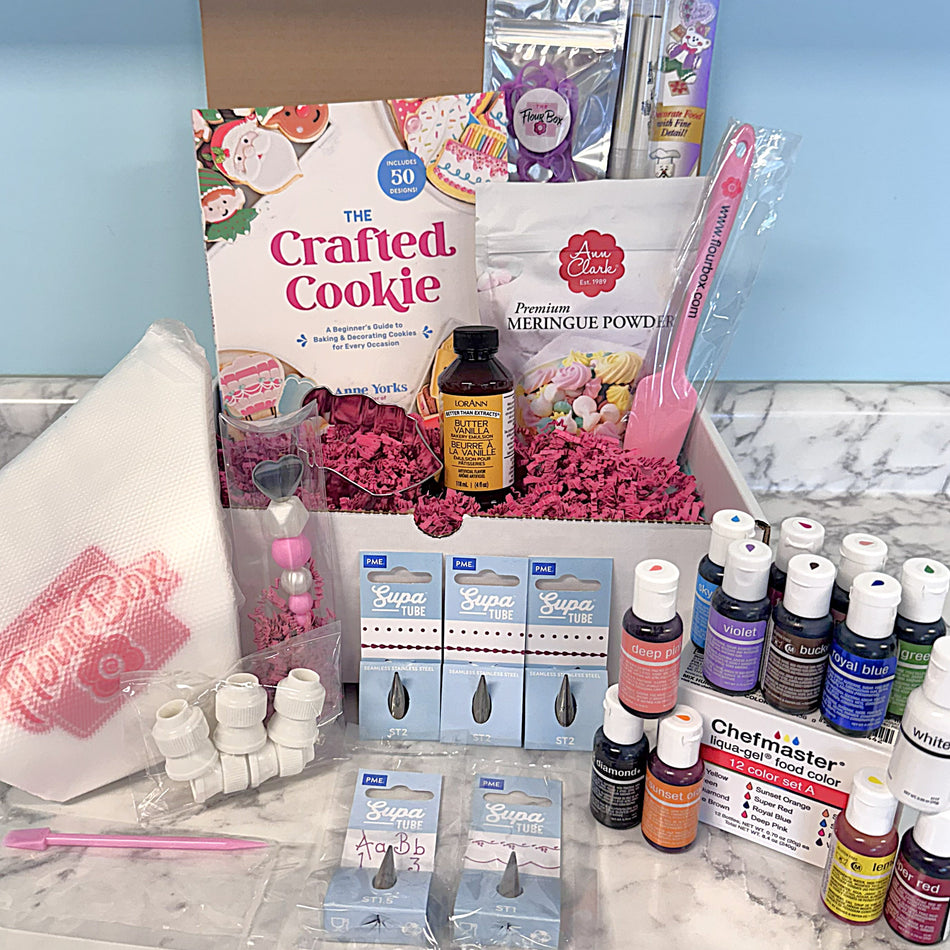
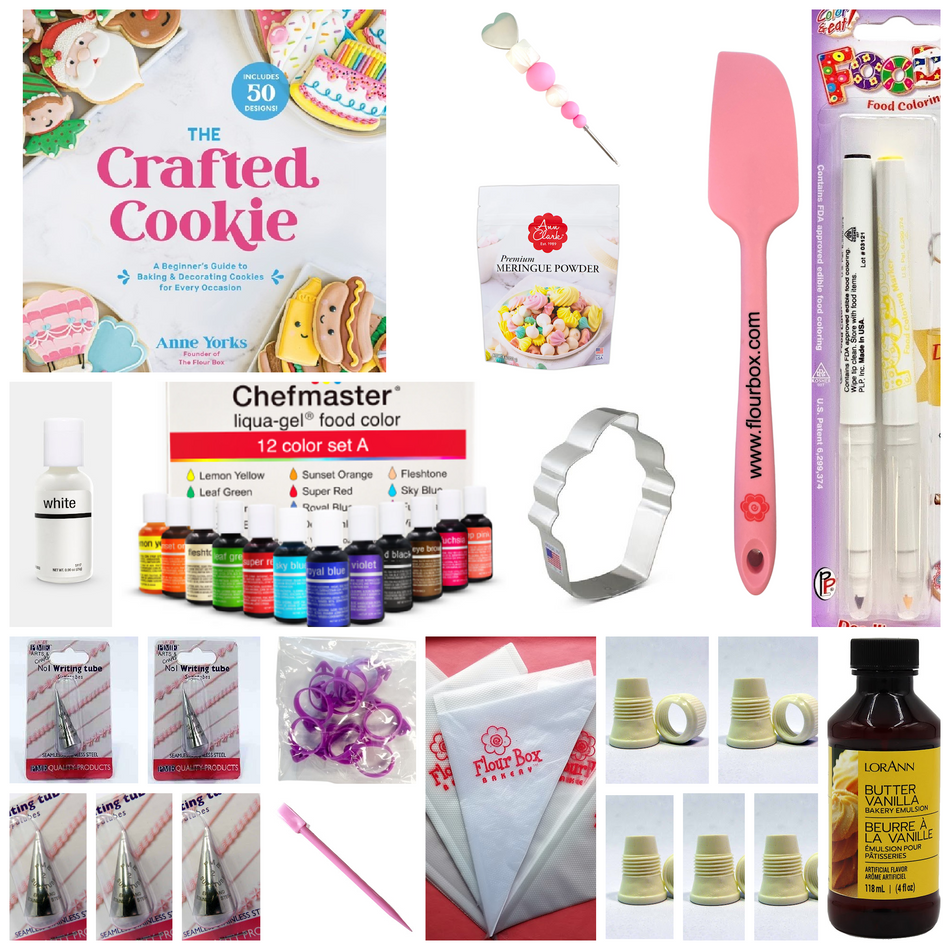
Cookie Decorating Starter Kit
$117.19
What's included?
Here's a list of everything that's part of the kit - all with a 10% savings when purchased together!
- 12 Color Kit SET A Chefmaster .70oz LIQUA-GEL
- The Crafted Cookie, by Anne Yorks
- 100 Tipless 13" (Large) Disposable Icing Bags
- Pink Boo Boo Stick
- #2 PME Supatube Tip Writer
- #1 PME Supatube Tip Writer
- #1.5 PME Supatube Tip Writer
- Meringue Powder 8oz from Ann Clark
- Butter Vanilla Lorann Baking Emulsion 4 oz.
- FooDoodler Black and Yellow Fine Line Marker Set (2 pens)
- Bright White .90oz Chefmaster LIQUA-GEL
- Pink Flour Box Silicone Spatula
- Classic Chic COTTON CANDY Cookie Scribe
- Flour Box Icing Bag BANDS
- Ateco Standard Coupler
- Cupcake with Swirl Cookie Cutter
Don't need all of these items?
No worries! You can buy just the items you want!
Pick what I needTo start any cookie decorating adventure, you'll need to mix dough, bake cookies, and make icing. In this tutorial, I'll share my recipes and tips for both the cookies and royal icing. This is a long post, but it has the essential information to get started.
All of my cookie videos feature my cookie and icing recipes. I have tested these over years of baking and decorating. I love both of my recipes, but remember, we all have different taste and texture preferences, so try several recipes to see what fits you best!
Plan enough time to do each step. Typically I bake cookies and make icing the DAY BEFORE I decorate. This helps break up the process and maximize the fun! Let's start with making the dough and baking the cookies.
Making the Dough (30 mins)
Cookie Recipe
1 cup (or 2 sticks) of butter – softened
1 cup sugar
1 egg
1 ½ tsp flavor, vanilla, almond, lemon, etc. (I like the flavor emulsions)
2 ¾ cup AP Flour (+ a little extra for rolling)
½ tsp. salt (omit if using salted butter)
Yields 18-24 cookies (varies on size and thickness of cookie)
(This recipe can be doubled in most 5Qt mixers. I have heard of some tripling it in a 7-8Qt mixer. Just listen to your motor for any sign of strain. You don’t want to burn it out!)

- Cream together 1 cup softened butter (I leave it out for an hour before mixing) and 1 cup sugar until blended and light and fluffy.
- Add 1 egg and 1 ½ teaspoon flavoring and incorporate (I like to use LorAnn’s emulsions because the flavor does not bake out. Butter Vanilla is my favorite).
- Add flour one cup at a time.
- Mix on low just until incorporated. Overmixing can result in a tougher cookie.
**When mixing, cream butter and sugar together until fluffy. Then add egg and flavor until incorporated.
**Don't over flour your recipe. Spoon (don't scoop) flour into your measuring cup. Then add one cup of flour to the dough at a time. Don't over mix your flour - it will result in a tougher cookie.
Storing the Dough
Wrap dough in plastic wrap. Flatten out the dough. Don't chill in a ball shape, but rather a flattened brick for easy rolling. Chill dough for at least 2 hours. Not only will the dough be easier to roll, but the ingredients will mingle for a better flavor. Use your chill time to sketch out and plan cookie designs ahead of time. If you’re new to decorating, plan 2-3 designs to keep your project manageable.

You can chill dough up to 3 days. If you’re not planning to use it within 3 days, pop it in the freezer. I wrap it well in freezer quality gallon ziplock bags. I store up to 3 months. I do keep Arm & Hammer up-to-date in my freezer to keep the dough from adsorbing any funky smells.
Rolling and Baking the Cookies
Always use parchment paper for even browning and to prevent cookies from sticking to the sheet.
For even thickness, use dowel rods or rolling pin bands.
Or you can invest in a Dough EZ rolling system. This is what I have used for years and love it! The system includes a non-stick rolling mat and 6 spacer sticks (to keep the dough rolled at an even thickness). Cleaning up after rolling out cookies has never been this easy. I have rolled thousands of cookies with this new mat. And, not only does DoughEZ offer a flourless way to roll out cookie dough, but the guide sticks also keep the dough the same thickness. It's great for even baking. My cookies look and taste better than ever!

5. Pre-heat oven to 350 degrees. (ovens vary, so test your recipe and baking temps!!!)
6. Bake for 11-13 minutes. (baking times also vary, so test your recipe and baking times!!!) Cookies should just barely be a light brown on the edge.
7. Cool cookie completely before decorating!
Bake similar sized cookies together for even browning. A mini cookie baked next to a jumbo sized cookie might result in varied doneness. Cookies keep their shape best if dough is chilled before rolling and again for 10-20 minutes after they are cut (before baking).
**Oven temps and baking times mentioned in the video are suggested for home/residential ovens. But these times vary, so definitely watch your cookies and look for light golden brown edges to indicate they are done!
Storing and Freezing Cookies
I have frozen both decorated and undecorated cookies with success. I use a freezer quality bag and keep my freezer free of any funky smells (again, Arm & Hammer baking soda is helpful).
When I freeze decorated cookies, I allow 18 hours of dry time for the icing before packing and freezing. I wrap cookies individually and then put them in the freezer bag. When I take them out, I allow the cookies to come to room temp before opening the bag. This prevents condensation from forming in the bag and causing any icing issues. If you're uncertain about freezing cookies, do a tester. I bet you can't tell the difference!
Making Royal Icing (plan for 1 hr to mix icing and make colors)
Royal Icing Recipe
1/3 cup warm water, plus several tablespoons for making icing consistencies
¼ cup Meringue Powder (I use the Genie brand)
1 tsp flavor (I use Genie Clearly Not Vanilla)
2 tsp White Chefmaster Food Gel
Recipe can easily be doubled in a 5 Qt Mixer!!
Here are the steps to making royal icing:
- Pour 1/3 cup warm water into mixer. The warm water will help dissolve the meringue powder.
- Add ¼ cup meringue powder.
- Mix for a minute or so on medium speed until fluffy and foamy. Scrape sides if necessary.

4. Add 1 tsp of flavor and mix until incorporated. I use vanilla (Genie's Clearly Not Vanilla). You may wish to use clear vanilla for an extra white base icing. Lemon and/or almond are also popular icing flavors.

5. Once the water and meringue powder mixture is fluffy and foamy, add 1 pound of powdered sugar; which is approximately 4 cups. Keep mixer on low, add slowly to avoid a powdery explosion. Using the plastic shield or putting a kitchen towel over the mixer also helps to contain sugar spills and poofs. To reduce lumps/tip clogs, you may wish to sift your sugar first (I don’t sift…I just switch icing tips or poke a toothpick in to break up the clog)
6. Once all the sugar is added, I increase the speed to 4 (or a medium/low speed). The amount of mixing time can vary from 4-7 minutes depending on the humidity. Beat icing until it changes from the ivory color to a white. After a few minutes of mixing, you’ll notice the icing will become stiff and it increases in size.
7. Add WHITE food color to the icing. I usually add 2 tsp (or just a really good squeeze). Adding the white food color reduces/eliminates butter bleed issues for me (see more details below under common icing issues).

If your icing seems too stiff, add another tablespoon or two of water to loosen the icing a bit. I like to mix the icing thick, but then use the water to bring it to a nice soft peak/piping icing consistency.

This photo is a great example of a soft peak...perfect for PIPING!!
- Separate icing into containers with an airtight lid. (If left uncovered, icing will crust.)
- Start mixing colors. Use concentrated food gels (I like Chefmaster!) and mix to desired color. Add slowly…you can always add more if needed.

10. I use a glass to hold my icing bag while I fill. A damp paper towel in the bottom of the glass helps keep the tips from drying out.
11. Remove a small portion ¼ - ½ cup for piping and put it in the icing bag.
12. Then use remaining for flood icing. Add a teaspoon or 2 to the icing the thin it down to the flood icing consistency.

See how this icing ribbons and sits up on top of the icing. It will eventually blend in, but this is a great example of the Flood consistency. Not too thick, but not thin/watery! I pour this icing into a squeeze bottle or tipless bag for flooding.
Storing Icing
I like to mix my icing the day before I decorate. Since I'm using meringue powder, I will store icing on the countertop. But, if you're using a recipe with egg whites, you'll need to store the icing in the refrigerator.
If I'm working a few days in advance, I will store icing the refrigerator (up to a week).
If I'm working a few weeks in advance (like for a BIG cookie project), I will store icing in the freezer...again in a freezer quality container. Arm & Hammer will keep your freezer from getting funky.
Icing Consistencies
I mainly use two icing consistencies, Piping (thick) and Flooding (thin). But occasionally, I also use 20-second icing (medium) and Stiff (extra thick). Here's the difference between them:
Piping Icing (thick) Consistency
I like a soft peak piping consistency. This is the icing I use to outline cookies and pipe details. The consistency I use can be compared to soft serve ice cream. I usually have to add water to the icing straight out of the mixer if it is too stiff. It should have slight movement, but not flow off your spatula.
**As you saw in the video, this icing is what gets colored. I take out a small portion and put in a piping bag. Then I thin the rest with water to make the flood icing.
Flooding Icing (thin) Consistency
The flood icing is thinner and similar to syrup - has a flow to it, but not too thin, not watery. I also call this icing 10-second icing. This is the icing that I squeeze onto the surface of the cookie to create the flat base layer. If you get the right consistency, it should self-level and not appear bumpy once dry. After I color my icing, I add several drops of water (up to a tsp) to it to thin it down to the flood icing. Do the spatula test. Draw a line in the icing with your spatula. It should take about 10 seconds for that line to disappear.
20-second Icing Consistency
I use another icing consistency occasionally, called 20-second or Medium icing. It is a hybrid of the piping and flooding. It's thinner than piping, so it has some flow. But it is thicker than flooding and holds its shape a bit. I love this icing consistency for small icing areas or decorating mini cookies.
Stiff Icing Consistency
The other icing consistency I occasionally use is the stiff icing consistency. This is icing forms stiff peaks in the mixing bowl. This is what the icing looks like before I thin it down to the soft-peak piping icing. I use it for Stenciling and Icing Flowers.
Take a deep dive into icing consistencies with this helpful video!
Drying Icing/Using a Fan
The meringue powder in the icing will make it dry like a 'candy' surface and so you don't have to worry about it melting. Do dry cookies in front of a fan for a few hours. Then let them continue to dry on the cookie sheet in the cool oven overnight. They are ready to pack after 18-24 hours from that first flood.
Common Icing Issues
Craters and Cracks
Craters and cracks in icing can be so frustrating! They appear after the icing dries. Small areas can crater and crack. I find thicker icing helps reduce that. But I also like to use a fan to reduce craters. It also speeds up the drying.
Air Bubbles
A variety of things will cause bubbles (mainly when adding water and mixing the flood consistency). I find that if I make my icing too thin I see more bubbles. I also like decorating with the bags (flood) because they seem to pop the bubbles. Finally, letting the icing rest for 30 minutes before flooding allows bubbles to rise to the to and can be popped with your spatula.
Lumpy Icing
Double check your flood icing and make sure it is a 10-second icing. If the flood is too thick, it won't flow smooth and create a flat surface.
Icing that Never Dries
Adding too much color can negatively affect your drying time. I notice this mostly with red, black and navy. I mix these colors the day before. I am careful to mix to a charcoal color and then it will deepen overnight.
Butter Bleed
'Butter Bleed' is splotches (or dark spots) that show up on the icing after it dries. I notice this issue with darker icing colors, like red. The cause of butter bleed is debated, but it seems as though butter from the cookie seeps up through the icing and leaves those marks. I find it best to add White Food Gel to my icing when I make it. This reduces/eliminates this issue. I have also tried baking cookies longer, letting them rest 24 hrs before decorating, and setting them on a paper towel (to adsorb the butter), but none of those solutions worked for me.
Getting Shiny Icing (or avoid a matte finish)
I use a clean floor fan to dry my icing. I clean the fan regularly. It sits in front of the bakery rack (or counter). I use it on high speed. I place the cookies in front of the fan for at least an hour. That moving air across the surface not only speeds up the drying, but it also adds shine, too.Some decorators use a teaspoon of corn syrup in the icing to get a shiny finish. I personally like the simple straight forward recipe, so I do not add this, but it could be another option if you're looking for shiny icing!
How Much Icing Should I Make?
Stop running out of icing and plan ahead for each icing color. CLICK HERE to Check out this in-depth blog post for a detailed look at icing planning. But, to quickly summarize, I generally use 1 ounce of icing per cookie. Again, check out this blog post for a really in-depth look at planning.
Piping and Flooding Tips
Totally new to the cookie decorating scene? No worries! CLICK HERE to check out this video for my piping and flooding tips to get a full, smooth looking cookie everytime!