Sweet Land of Liberty Cookie Kit
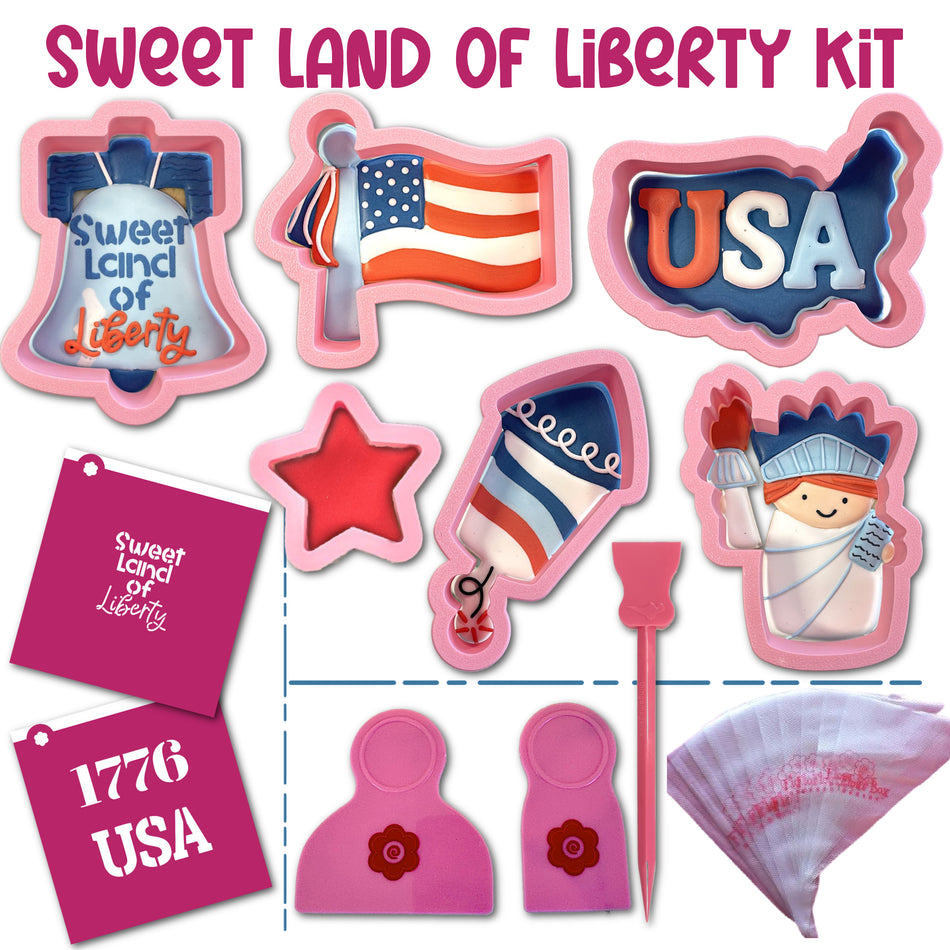

Sweet Land of Liberty Cookie Decorating Kit
$30.99
What's included?
Here's a list of everything that's part of the kit - all with a 10% savings when purchased together!
- Flag with Streamers Cookie Cutter
- USA Map Cookie Cutter
- Liberty Bell Cookie Cutter
- Statue of Liberty Cookie Cutter
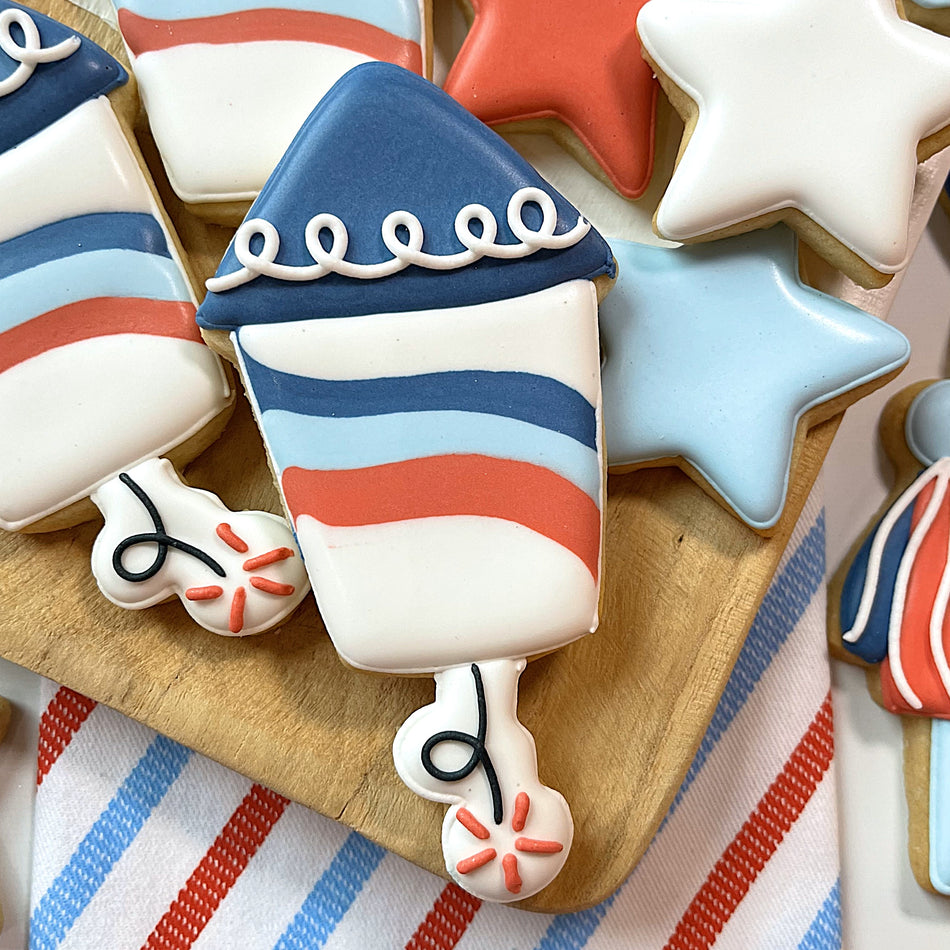
- Groovy Firework Cookie Cutter
- Mini Star Rounded Cookie Cutter
- Sweet Land of Liberty Stencil
- USA and 1776 Stencil
- Pink Icing Scraper 2pc Set
- Tipless Icing Bags SAMPLE 10-Pack
Don't need all of these items?
No worries! You can buy just the items you want!
Pick what I needSummer is here, and that means fireworks, parades, and PATRIOTIC DESSERTS that steal the show at every celebration. This year, make your Fourth of July baking extra special with our Sweet Land of Liberty Cookie Set — a festive collection that lets you celebrate America with sugar, frosting, and flair!

Whether you're hosting a backyard barbecue, attending a picnic, or simply looking for a fun afternoon activity, these cookies are the perfect treat to show your red, white, and blue spirit.
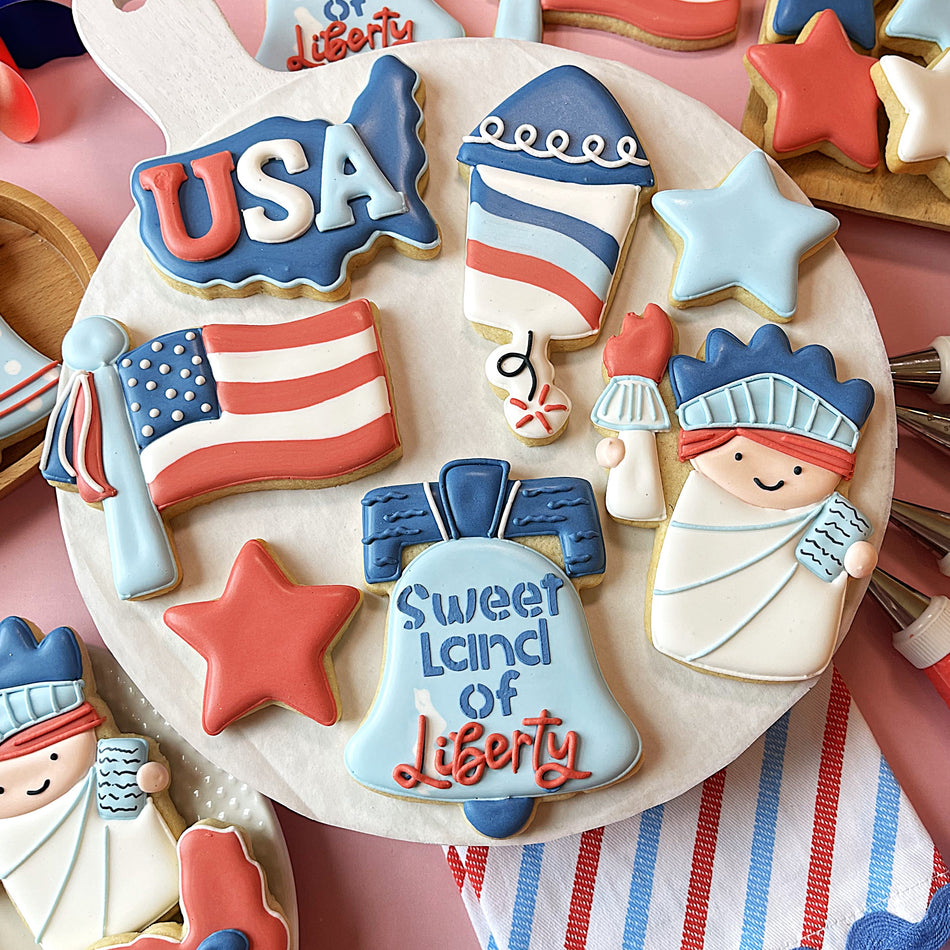
The Sweet Land of Liberty Cookie Cutter Set includes five uniquely American shapes designed to turn your cookie platter into a patriotic masterpiece:
-
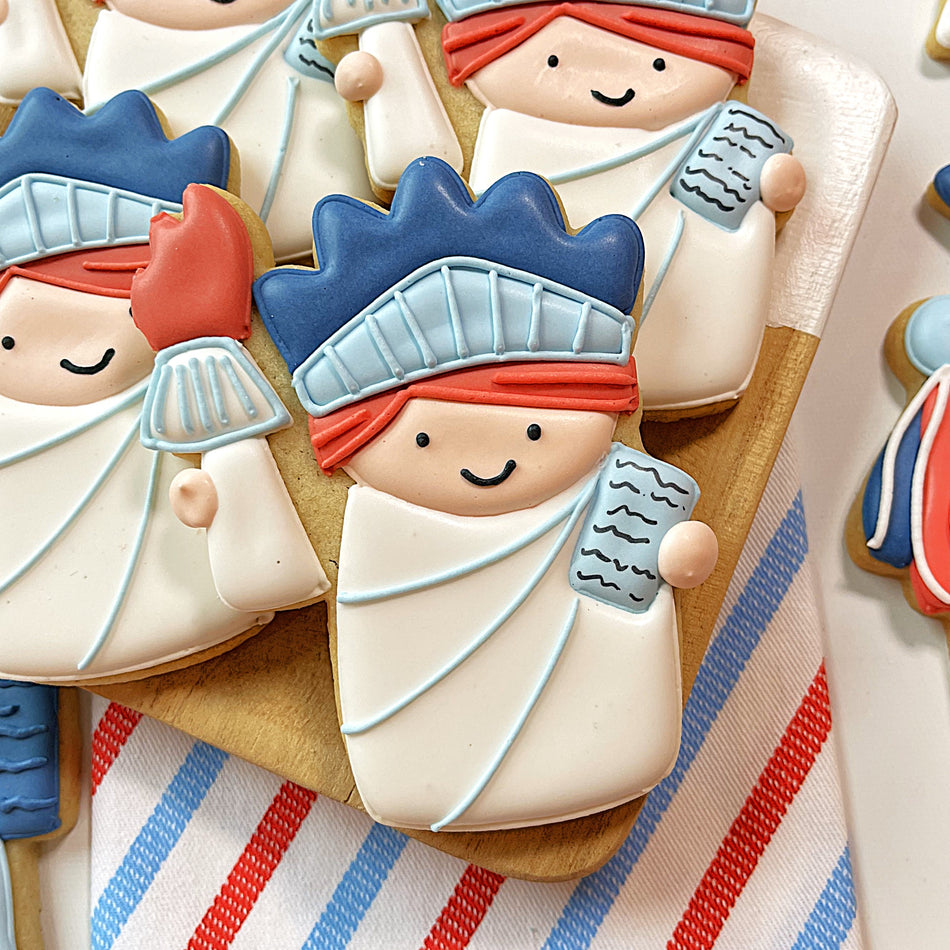
Statue of Liberty – A symbol of freedom and welcome, this elegant cutter captures Lady Liberty in all her glory. Decorate her crown, robe, and torch for a cookie that’s almost too pretty to eat.
-
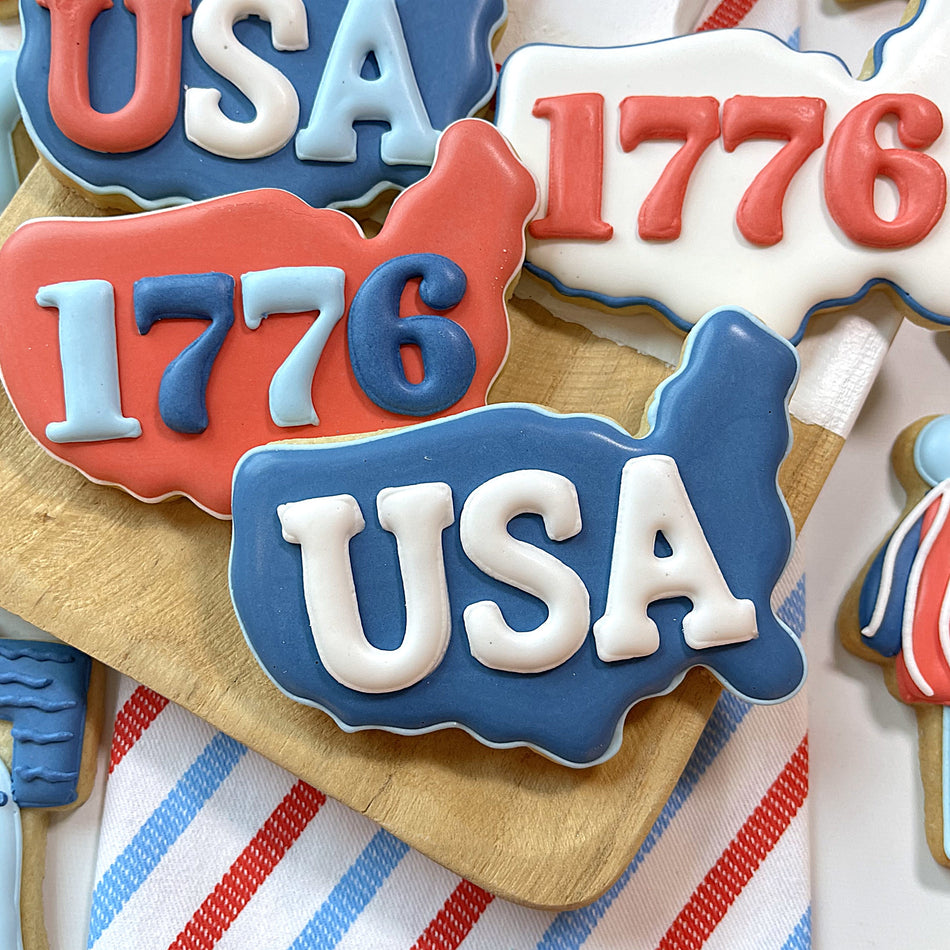
USA Map – Perfect for geography buffs and travel lovers alike, this cutter outlines the full continental United States. Use the USA and 1776 stencil to add text to the cookie.
-
Mini Stars – No celebration is complete without stars! These bite-sized cookies are ideal as party snacks, cupcake toppers, or accents to your main cookie display.
-
American Flag – Stars and Stripes are required for a patriotic dessert platter! Use red and white stripes and a blue corner with white star sprinkles or piped details. Add some streamers for a cute detail.
-
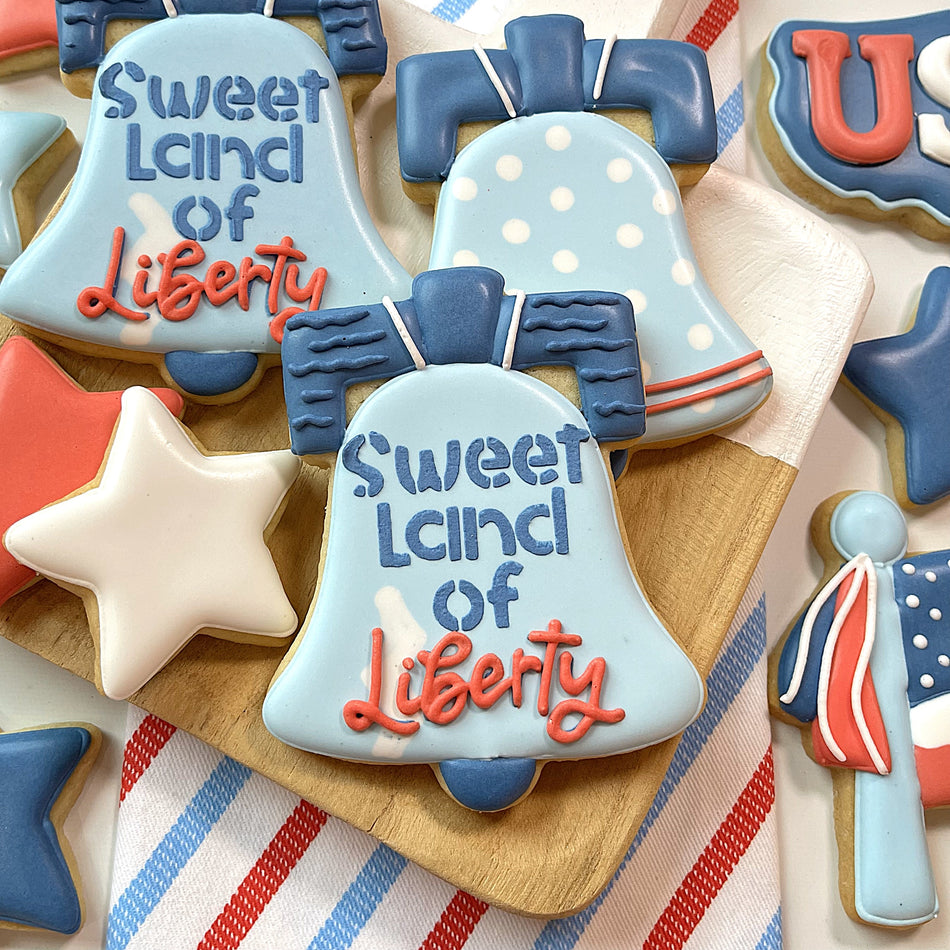
🔔 Liberty Bell – Crack included! This timeless American symbol is a sweet nod to history, made easy and perfect with stenciled text!
- Groovy Fireworks – Our new favorite! This whimsical cutter adds a dynamic pop to your spread. Use bright colors, swirls, and edible glitter to bring these festive bursts to life.

Baking & Decorating Tips
-
Royal Icing Is Your Friend: For clean lines and bold colors, use royal icing. It dries firm and shiny, making it perfect for detailed decorations like the flag or Statue of Liberty.
-
Color Smart: Stick with patriotic classics—vibrant reds, navy blues, and crisp whites. Gel food coloring works best for strong colors without thinning your icing.
-
Get the Kids Involved: The mini stars and USA map are great for little hands. Let them sprinkle, ice, and enjoy being part of the celebration.
A Treat for Every Occasion
While these cookies are perfect for the Fourth of July, they also shine at Memorial Day, Veterans Day, Election Day gatherings, or even themed classroom projects. Pair them with other patriotic elements like blueberry pie, sparklers, or a backdrop of American tunes for a fully immersive celebration.
Cookie Yield
For a single batch of dough, you can make about 20-24 of these 5 regular sized cookies (about 4-5 of each). Make minis using up the leftover dough. I should note that I roll my cookies to 1/4" thick using the Dough EZ Rolling Mat System. The thickness of your cookies will impact your yield.
COOKIE RECIPE: For a cookie recipe and rolling and baking video CLICK HERE - this recipe can be doubled in a KitchenAid Mixer.

Prepping the Royal Icing
Check out the icing guide below for tips on making the right colors and an estimate of how much of each color you'll need.
For a single batch of dough, I typically use a single batch of icing. Since I'm using a KitchenAid mixer, I made a double batch of icing and split it in half (reserving half for another project).
ICING GUIDE

ICING PLAN (amounts will vary depending on the number of cookies you are making)
Here is what I suggest making for a single batch.
Navy (light) - 5 oz (pipe and flood)
Navy (dark) - 5 oz (pipe and flood)
Red Red - 5 oz (pipe and flood)
White - 5 oz (pipe and flood)
Black - 1 oz (pipe only)
Sienna - 1 oz (20-second only)
For a more detailed look at icing planning, CLICK HERE to read this helpful blog post.
ROYAL ICING RECIPE
For a royal icing recipe and video CLICK HERE - this recipe can be doubled in a KitchenAid Mixer.
Project Timeline
Plan ahead to enjoy the most success with your cookie project! I break up the decorating process. It works better with my life to do a little each day. Here is the schedule for this cookie project and estimated times on how long each phase takes.
DAY 1
Mix Dough (30 mins), Chill Dough (2 hours inactive time), Roll and Bake (1 hour), Mix Royal Icing and Prep Icing Colors the day before you decorate (1 hour)
DAY 2
Outline and Flood Cookies (1-2 hours), Allow to dry in front of fan before adding details (1 hour for standard cookies). Piping details (1-2 hours). I typically allow the icing to dry 4-6 hours before stenciling.

**ALLOW COOKIES TO FULLY DRY 18-24 HOURS BEFORE PACKING. STORE IN A COOL OVEN OVER NIGHT.**
DAY 3
For tips on packing cookies, CLICK HERE to check out this helpful blog post with links to my favorite packing and shipping materials.
Recreate these!
Pick up the Kit! It's got the essential cutters and sprinkles and a few bonus tools!

Common Tools Needed Not Included in the Kit:
click on the tool to view in shop
- Food Gels
- Tip #2 (PME or Wilton brand) for outlines and details
- Tip #1.5 for the details on the Statue of Liberty
- Couplers
Pin this Post and Tag Me!

I would be so flattered if you recreated these cookies! Be sure to tag @theflourboxshop or use hashtag #theflourbox so I can see what you create!
Happy Decorating!
Anne
P.S. Whether you're a seasoned cookie decorator or just starting out, these shapes will bring joy, creativity, and a big dose of Americana to your kitchen. This year, let your sweet tooth sing: “Sweet Land of Liberty, of thee I bake!”
🧁🇺🇸✨