Nativity Cookie Decorating Kit


Nativity Cookie Decorating Kit
$28.83$25.95On sale!
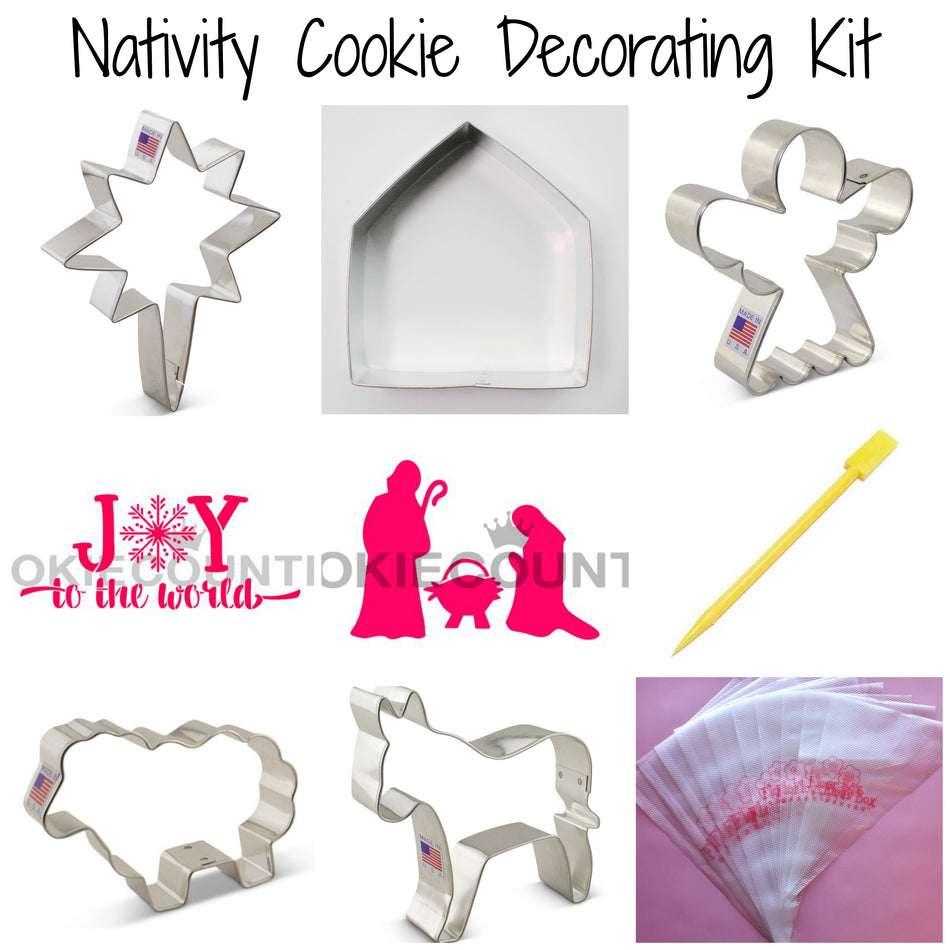
What's included?
Here's a list of everything that's part of the kit - all with a 10% savings when purchased together!
- 2-1 Tool
- Angel Cookie Cutter
- Bethlehem Star Cookie Cutter
- Cute Sheep Cookie Cutter
- Donkey Cookie Cutter
- Joy to the World Snowflake Stencil
- Nativity Silhouettes Stencil
- Stable Cookie Cutter
- Tipless Icing Bags SAMPLE 10-Pack
Don't need all of these items?
No worries! You can buy just the items you want!
Pick what I needMy favorite Christmas tradition is setting up our nativity set. Every year, we unwrap the figures and try to find Mary, Joseph, and Baby Jesus. I have done this every year since I was little and now I do this with my own girls. My big brother still comes over for the event too!
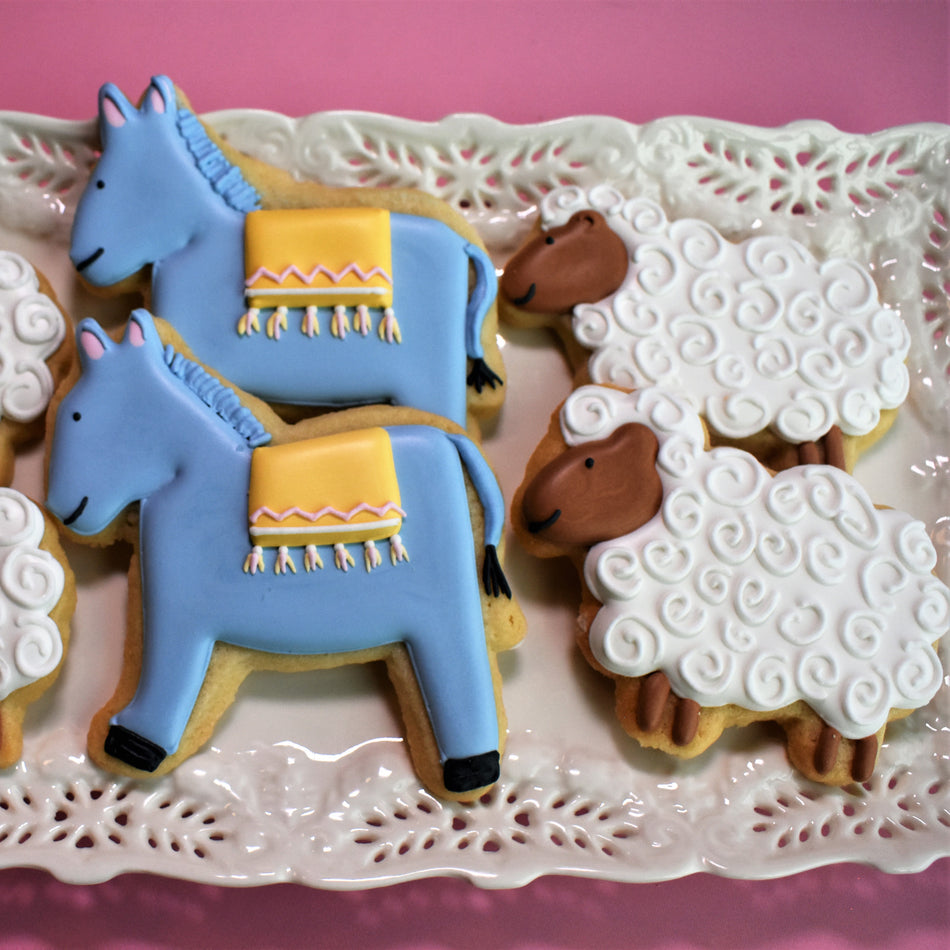
Each Christmas, I try to decorate Nativity cookies. I'll post some of my projects below if you're looking for more inspiration. But this tutorial is going to focus on these five cookies: The Nativity Stable, Bethlehem Star, Angel, Sheep and Donkey.

Cookie Yield
COOKIE YIELD:
These cookies are all in the 3’ – 4” size range, except for the stable/house cookie. That is larger at 4.5". With a single batch of dough I made 18 cookies: 3 stables, 4 angels, 4 sheep, 4 stars, and 3 donkey. I should note that I roll my cookies to 1/4" thick using the Dough EZ Rolling Mat System. The thickness of your cookies will impact your yield.

Even a single batch of cookies makes a really nice platter! But double it up if you have a cookie exchange in your future!

COOKIE RECIPE:
For a cookie recipe and rolling and baking video CLICK HERE - this recipe can be doubled in a KitchenAid Mixer.
Prepping Royal Icing
I love this color palette. I don't know if it is the softness of the colors or the way they work together, but this is my new favorite palette! Here's the guide ...

The one color that was a pleasant surprise was the donkey blue/gray. Can you guess what it is? It's a small dot of navy food gel!

For a single batch of dough, I typically use a single batch of icing. Since I'm using a KitchenAid mixer, I made a double batch of icing (about 36 oz) and split it in half (reserving half, or 18-19 oz, for another project).
I don't measure exactly...I estimate. Here's what worked for me on this Nativity project:
ICING PLAN BY THE OUNCE
Buckeye Brown - 2 oz (pipe and flood)
Royal Blue - 3 oz (flood)
White - 3 oz (pipe and flood)
Light Gold - 3 oz (pipe and flood)
Medium Gold - 2 oz (pipe and flood)
Navy (pastel) - 3 oz (pipe and flood)
Fleshtone - 1 oz (20-sec icing)
Coal Black - 1 oz (stiff pipe only)
For a more detailed look at icing planning, CLICK HERE to read this helpful blog post.
ROYAL ICING RECIPE
For a royal icing recipe and video CLICK HERE - this recipe can be doubled in a KitchenAid Mixer.
Project Timeline (and tips for decorating with kids)
I like to break up the decorating process to fit in my schedule - especially during the busy holiday season! And that is even more important if you're going to decorate these with kids! Because there are several phases to decorated cookies, it works better with my life to do a little each day. Here is the schedule for this cookie project and estimated times on how long each phase takes.
DAY 1 (this is prep work that can be done without kids if needed)
Mix Dough (30 mins), Chill Dough (2 hours inactive time), Roll and Bake (1 hour), Mix Royal Icing and Prep Icing Colors - it is helpful to make the colors the day before you decorate because the color will deepen overnight (1 hour).
DAY 2 (Kids LOVE to decorate! So here's the fun part!)
Outline and Flood Cookies (1-2 hours), Allow to dry in front of fan before adding details (1 hour for standard cookies, but allow 6 hours of dry time on the cookies stenciled with royal icing like the stable or star), Piping details, and stenciling (1.5-2.5 hours)
**ALLOW COOKIES TO FULLY DRY 18-24 HOURS BEFORE PACKING. STORE IN A COOL OVEN OVER NIGHT.**
DAY 3
For tips on packing cookies, CLICK HERE to check out this helpful blog post with links to my favorite packing and shipping materials.
Tips for decorating with kids!
Decorating with kids is so much fun! But to help with the mess and stress, here are few tips for including young children with a cookie project.

1. Prep the cookies and icing before decorating. Try do this the day or morning before decorating to break up the work! Kids can help!

Or they can sketch their plans.

2. If you're decorating with young children, it might be less mess to use bottles. The bottles are easy to hold. They sit on the table. And unlike bags, they don't allow the icing to squirt out the top.

3. If decorating with young children outline (or even flood) a few cookies before decorating together. The outline sets the parameters and the kids can jump right in and start filling the icing areas - it's almost like a coloring book. Consider having a few that are already flooded. Then the kids can add some piped details without waiting. Otherwise, plan something fun for the hour when the cookies are drying. Make cookie tags for the cookie platter or box, for example!
Did you know Dads like to decorate too?? And they are CREATIVE! (this double reindeer was a cookie cutter that was the word joy).

4. Don't get stressed if it's not perfect. And, let the kids explore and have fun without the stress of telling them what to do. If they ask for help, definitely give some guidance, but usually they want to do it their way. I'll be honest, this is hard for me. But we all have the most fun when the kids are free to do the decorating!
More Nativity Cookie Inspiration
An abstract nativity heart cookie from 2015...

Cute Nativity cookies from 2014 ...

I made both of those projects for my mom as a christmas gift. She loved them!
Recreate these!
I would be so flattered if you recreated these cookies! Be sure to tag @theflourboxshop or use hashtag #theflourbox so I can see what you create!
Happy Decorating!
Anne